Find Damp Proofers in Your Area
- Damp Proofers in St Helier
- Damp Proofers in Nottingham
- Damp Proofers in Cambridge
- Damp Proofers in Isle of Man
- Damp Proofers in London
- Damp Proofers in Newcastle upon Tyne
- Damp Proofers in Manchester
- Damp Proofers in Belfast
- Damp Proofers in Edinburgh
- Damp Proofers in Guildford
- Damp Proofers in Bristol
- Damp Proofers in Cardiff
- Damp Proofers in Birmingham
- Damp Proofers in Leeds
Find Local, Vetted Damp Proofers on ServiceTasker
Discovering damp in your home is a worry. Whether it’s a musty smell you can’t quite place, peeling wallpaper in the corner of a room, or a visible damp patch spreading up from the skirting board, it’s a problem that won’t fix itself. Left unchecked, damp can lead to more serious issues, including timber decay, crumbling plaster, and even health problems caused by mould. It’s a common issue in UK properties, from Victorian terraced houses to modern new-builds, but it requires a professional solution.
Simply painting over a damp patch is a temporary fix at best. The key is to correctly diagnose the source of the moisture and treat the root cause. This is where a specialist damp proofer is essential. They have the knowledge, experience, and diagnostic tools to identify the type of damp you’re facing and recommend the most effective, long-term solution.
Finding a trustworthy and competent tradesperson can feel like a challenge. That’s why ServiceTasker exists. We connect you with a network of local, vetted damp proofing experts in your area. Get transparent quotes, compare specialists, and hire with the confidence that you’re putting your home in capable hands. Don’t let damp devalue your property and affect your family's health; find a professional solution today.
Your Future Damp Proofers Hero Is Just One Task Away — Let’s Find Them
Understanding Damp: The Three Main Culprits in UK Homes
Before you can tackle damp, it’s crucial to understand what you’re dealing with. A professional survey is the only way to be certain, but knowing the main types of damp will help you have a more informed conversation with your specialist. In the UK, household damp typically falls into one of three categories.
Rising Damp
As the name suggests, rising damp is moisture from the ground that travels upwards through the porous masonry of your walls via a process called capillary action. Nearly all properties are built with a barrier called a Damp Proof Course (DPC) – a layer of waterproof material in the lower section of the wall designed to stop this. Rising damp occurs when this DPC is non-existent (as in some very old properties), has failed due to age, or has been bridged by something outside, like a raised flower bed or a newly laid patio that sits higher than the DPC.
- Classic Signs: A characteristic ‘tide mark’ appearing on the wall, usually no higher than 1 to 1.5 metres from the ground floor. You might also notice damp or rotting skirting boards, crumbling plaster, and peeling paint or wallpaper in the affected area.
Penetrating Damp (Rain Penetration)
Penetrating damp is caused by water finding its way into your home from the outside, through the building's fabric. This can happen at any level of the property, unlike rising damp which is restricted to the ground floor. It often appears after periods of heavy or prolonged rainfall and is caused by a defect in the building's structure.
- Common Causes: These are varied and can include cracked or defective rendering, porous brickwork, faulty pointing between bricks, blocked or broken gutters and downpipes, damaged roofing tiles, or poorly sealed window and door frames.
- Classic Signs: Localised damp patches on walls or ceilings that feel cold to the touch. These patches may grow or darken after it rains. You might also see water-staining, blistering paint, and eventually, the growth of black mould.
Condensation
Condensation is the most common type of damp found in UK homes and is a result of our modern lifestyles. Everyday activities like showering, cooking, boiling the kettle, and even breathing release moisture into the air inside our homes. When this warm, moisture-laden air comes into contact with a cold surface, such as a window or an external wall, it cools and releases the water, forming droplets of condensation.
- Common Causes: A combination of high moisture production and inadequate ventilation is the primary cause. Double-glazing and insulation, while great for energy efficiency, can sometimes exacerbate the problem by sealing a property too tightly, trapping the moist air inside.
- Classic Signs: Water droplets on windows or window sills, particularly in the morning. Patches of black mould (Aspergillus spp.) growing in corners of rooms, on ceilings, behind wardrobes, or in areas with poor air circulation like bathrooms and kitchens. You may also notice a persistent musty smell.
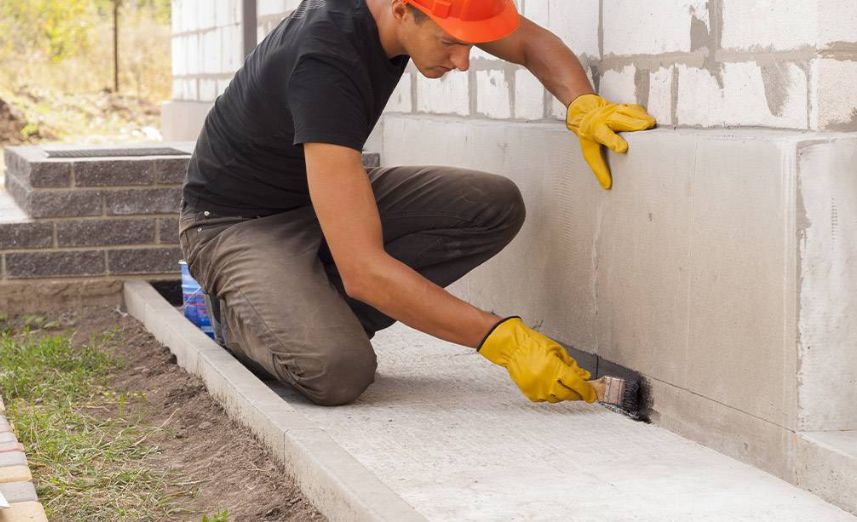
The Damp Proofing Process: What to Expect from a Professional
Once you’ve engaged a specialist via ServiceTasker, they will follow a methodical process to diagnose and treat your damp problem. A reputable damp proofer will never offer a quote over the phone without first inspecting the property. Here’s a step-by-step guide to what a professional service typically involves.
- Step 1: Thorough Survey and Diagnosis. The specialist will visit your home to conduct a comprehensive survey. This isn’t just a quick look. They will use their expertise and specialist equipment, such as a calibrated moisture meter, to accurately identify the source and extent of the water ingress. Correct diagnosis is the most critical step; treating condensation with a rising damp solution would be a costly and ineffective mistake.
- Step 2: Detailed Quotation and Plan of Action. Following the survey, you will receive a detailed written report and quotation. This should clearly outline the findings, the recommended course of treatment, a full breakdown of costs for labour and materials, and an estimated timeline for the work.
- Step 3: Site Preparation. Before the main work begins, the team will prepare the area. This involves protecting your floors and furniture with dust sheets and, where necessary, carefully removing any damaged skirting boards and hacking off contaminated wall plaster. This is essential as plaster can become contaminated with hygroscopic salts from the ground, which attract moisture from the air and will cause problems even after the source of damp is fixed.
- Step 4: Applying the Correct Treatment. The specific treatment will depend on the diagnosis. For rising damp, this typically involves drilling holes into the mortar course of the wall and injecting a chemical DPC cream. For penetrating damp, the focus will be on external repairs, such as re-pointing brickwork, repairing rendering, or fixing a leaking gutter. For condensation, the solution is usually to improve ventilation by installing extractor fans, air bricks, or a Positive Input Ventilation (PIV) system.
- Step 5: Re-plastering and Finishing. After the damp treatment is complete, the internal walls will need to be re-plastered. This is a crucial part of the process. Specialists use a salt-retardant render or a specific plastering system designed to prevent any residual salts in the masonry from being drawn through to the new surface.
- Step 6: Issuing a Guarantee. Reputable damp proofing companies, particularly those accredited by bodies like the Property Care Association (PCA), will issue a long-term guarantee for their work, especially for chemical DPC installations. These guarantees can last for 20 or even 30 years and are often insurance-backed, giving you complete peace of mind.
The Cost of Damp Proofing in the UK
The cost of resolving a damp issue can vary significantly. It depends entirely on the type of damp, the scale of the problem, the size of your property, and your geographical location. A small job fixing a leaking gutter will cost far less than installing a new DPC across the entire ground floor of a detached house. To help you budget, here are some typical cost estimates. Remember, these are guide prices only; you should always get a detailed, written quotation from a professional.
Average Costs for Common Damp Proofing Jobs
Damp Survey: A specialist survey is the essential first step. Expect to pay between £150 and £400 for a comprehensive survey and report. Some firms may offer to deduct this fee from the final bill if you proceed with the remedial work they quote for.
Rising Damp Treatment: The cost of injecting a new chemical Damp Proof Course (DPC) is usually calculated per linear metre. The average cost is between £70 and £120 per metre. For a typical wall on a semi-detached or terraced house (around 5 metres long), you could expect the injection itself to cost between £350 and £600. This does not include the cost of re-plastering.
Penetrating Damp Repairs: This is the most variable cost. A simple fix, like clearing a blocked gutter, might only cost £100 - £250. Repairing a patch of cracked rendering could be £300 - £600, whereas re-rendering an entire external wall could cost anywhere from £3,000 to £7,000 or more, depending on the size and accessibility.
Condensation Control: Solutions here range in price. Installing a new, powerful extractor fan in a bathroom typically costs between £200 and £450, including the fan and the electrician's time. For a whole-house solution, a Positive Input Ventilation (PIV) unit, usually installed in the loft, costs on average between £800 and £1,500 supplied and fitted.
Additional Costs to Factor In
It's important to remember that the initial treatment is often only part of the total cost. You should also budget for the following:
- Re-plastering: This is a major component of rising damp work. Specialist salt-retardant re-plastering can cost between £100 and £150 per square metre.
- Redecorating: Once the new plaster is fully dry, which can take several weeks, the area will need to be re-painted or papered.
- Replacing Fixtures: Any skirting boards, electrical sockets, or radiators that were removed will need to be re-fitted.
- Scaffolding: For external work on upper floors, such as re-pointing or rendering, you will need to factor in the cost of scaffolding hire, which can be several hundred pounds per week.
- Waste Removal: The cost of a skip to remove old plaster and other building rubbish might be an additional £200 - £400.
- Location: As with most building work, costs are typically higher in London and the South East, sometimes by as much as 15-25% compared to other regions of the UK.
Your Future Damp Proofers Hero Is Just One Task Away — Let’s Find Them
Why You Shouldn't Ignore Damp
Tackling a damp problem might seem like an unwelcome expense, but ignoring it will invariably lead to much bigger and more costly problems down the line. Acting quickly saves money, protects your property, and safeguards your health.
Structural Damage
Persistent moisture is the enemy of a building’s structure. It can soak into timber elements like floor joists, roof trusses, and window frames, leading to wet rot or, more menacingly, dry rot. Dry rot can spread aggressively through a building, causing catastrophic damage. Moisture can also cause brickwork to spall (flake and crumble) due to frost action in winter and degrade mortar, weakening the entire structure.
Health Implications
The link between damp, mould, and health problems is well-documented. Mould produces allergens, irritants, and sometimes, toxic substances. Inhaling or touching mould spores can cause allergic reactions like sneezing, a runny nose, red eyes, and skin rashes. For people with asthma, it can trigger attacks. The NHS advises that infants, children, the elderly, and those with existing respiratory or skin problems are particularly vulnerable.
Devaluing Your Property
Damp is one of the biggest red flags for potential house buyers. It suggests underlying problems and hidden costs. A surveyor will always highlight evidence of damp in their report, which can lead to buyers reducing their offer significantly or even pulling out of the sale altogether. Mortgage lenders can also be hesitant to lend on a property with untreated damp issues. Investing in a professional repair with a long-term guarantee not only solves the problem but also protects your property's value.
How to Choose the Right Damp Proofer on ServiceTasker
Finding a reliable tradesperson is paramount to getting a lasting solution and avoiding the nightmare of a 'cowboy builder'. ServiceTasker is designed to help you find qualified professionals, but it’s still wise to know what to look for when making your choice.
Key Credentials to Look For
- Accreditation: Look for specialists who are members of a recognised trade body like the Property Care Association (PCA). PCA members are audited to ensure they are technically competent and provide a high level of service.
- Relevant Insurance: Your chosen tradesperson must have Public Liability Insurance. For survey and diagnosis work, they should also hold Professional Indemnity Insurance. Don't be afraid to ask for proof of their cover.
- Proper Guarantees: For chemical DPCs and other major damp proofing systems, ask for an insurance-backed guarantee. This means that if the company were to cease trading, your guarantee would still be honoured.
- Experience and Reviews: Check their profile on ServiceTasker to see their history and past work. Look for experience with properties similar to yours, whether it's a stone cottage or a modern semi-detached.
Using ServiceTasker to Compare and Hire
We make the process of finding an expert simple, fast, and transparent. By posting your job on our platform, you can connect with multiple local specialists and make an informed decision without the hassle.
- 1. Post Your Job for Free: Click the button and create your job post. Describe the damp issue you've observed, where it is in the house, and any other relevant details. The more information you provide, the more accurate your initial quotes will be.
- 2. Receive Quotes from Local Damp Proofers: We'll send your job details to vetted damp proofing specialists in your local area. You’ll soon receive no-obligation quotes directly from interested tradespeople.
- 3. Compare Profiles and Hire with Confidence: Review the quotes and take the time to look at each specialist's ServiceTasker profile. You can assess their qualifications, areas of expertise, and experience. For significant projects, it's always good practice to use a written contract, such as a JCT Homeowner Contract, to ensure both parties are clear on the scope, costs, and timeline.
Take the First Step to a Dry, Healthy Home Today
A damp home is a problem that casts a shadow over your comfort and peace of mind. But with the right professional help, it’s a problem that can be definitively and permanently solved. The most important action you can take is to get an accurate diagnosis from a qualified specialist. This ensures you’re treating the true cause of the issue, not just the symptoms.
ServiceTasker provides the quickest and most reliable way to find trusted damp proofers near you. Stop worrying about that spreading stain or musty smell. Take control of the situation and protect your most valuable asset.
Enter your postcode now to get free, competitive quotes from local damp proofing experts and move one step closer to a dry, healthy, and happy home.
Cost Guide
Find Damp Proofers in States
- Damp Proofers in Channel Islands
- Damp Proofers in East Midlands
- Damp Proofers in East of England
- Damp Proofers in Isle of Man
- Damp Proofers in London
- Damp Proofers in North East England
- Damp Proofers in North West England
- Damp Proofers in Northern Ireland
- Damp Proofers in Scotland
- Damp Proofers in South East England
- Damp Proofers in South West England
- Damp Proofers in Wales
- Damp Proofers in West Midlands
- Damp Proofers in Yorkshire and the Humber
Answers to Your Common Questions
A damp proofer is a professional who specialises in preventing and treating dampness in buildings, ensuring structures remain dry and free from moisture-related issues.
Our platform connects you with independent local damp proofers. You can post your task and receive quotes from vetted professionals in your area.
While qualifications can vary, many damp proofers have certifications or extensive experience in damp treatment and building repairs. It's advisable to check reviews and ask for references.
Simply post your task on our platform detailing your damp proofing needs. Local professionals will then provide quotes, allowing you to choose the best option based on reviews and pricing.
No, our marketplace is free to use. You can connect with local damp proofers without any charges from our side.
Yes, once you receive quotes from local damp proofers, you can review their profiles and read feedback from previous customers to make an informed decision.


